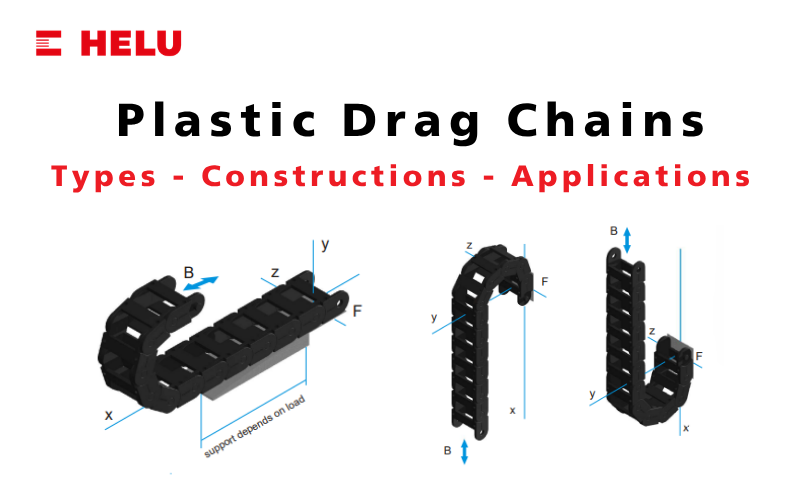
How to choose a drag chain online with HELUCHAIN Configurator
Need to choose a drag chain for a CNC machine, robot or automated production line? Getting the size, bending radius and inner layout right is not always easy. With HELUCHAIN Configurator, you can choose a drag chain online in just a few minutes. This article walks you through 7 steps to a complete configuration and order code.

Article content:
Learn about the HELUCHAIN Configurator tool
What is this tool?
To make selecting plastic, steel, and hybrid drag chains faster and more accurate, HELU has just launched the free online tool HELUCHAIN Drag Chain Configurator. You enter a list of cables and application specifications; the tool suggests suitable drag chain models, helps you arrange the cables within the chain, select connectors and cable clamps, and summarizes the results.
In just 7 steps – Start, Cable list, Application parameters, Inner space, Connectors, Strain relief and Result – you get a complete drag chain configuration without searching through catalogues.
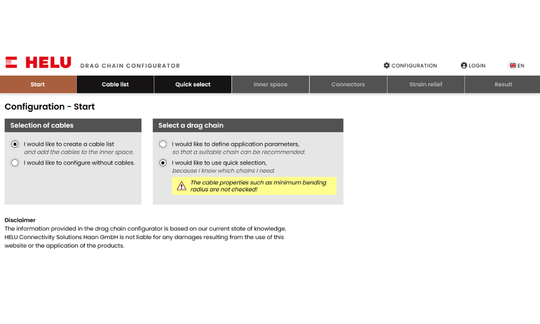
Online Drag Chain Configuration Tool
Benefits of HELU's drag chain configurator
- Time-saving: no catalogue look-ups or manual calculation of the inner space; a complete configuration takes only a few minutes.
- Fewer selection errors: the tool checks the bending radius, diameter and weight of every cable against each chain series and only suggests suitable options.
- Everything in one flow: the drag chain, cables, dividers, connectors and strain relief are configured together, so nothing is missing when you order.
- Order code and drawing included: the result contains the part number, cable cut lengths and an inner-space drawing that you can pass on to purchasing or assembly.
- Free, no registration: it runs in your browser, and you can save the configuration as a file to share with colleagues.
- Direct line to HELU: request a quotation from within the tool, with the full configuration attached, for faster advice
Who should use this tool?
- Machine and automation design engineers selecting drag chains and continuous-flex cables for CNC machines, robots, packaging machines and other equipment.
- Maintenance engineers replacing a damaged cable carrier or cables, or ordering a spare chain with the same configuration.
- Purchasing teams who need an exact order code and a complete list of accessories to request a quote.
- System integrators and OEMs comparing plastic, hybrid and steel drag chain options before finalizing a design.
Overview of the interface
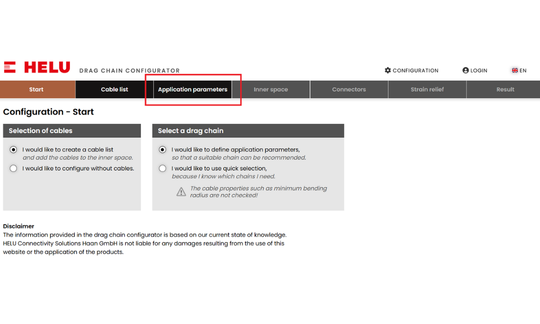
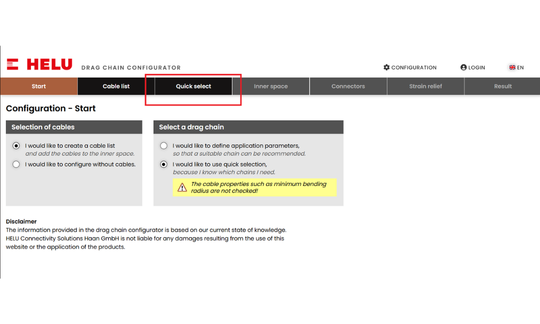
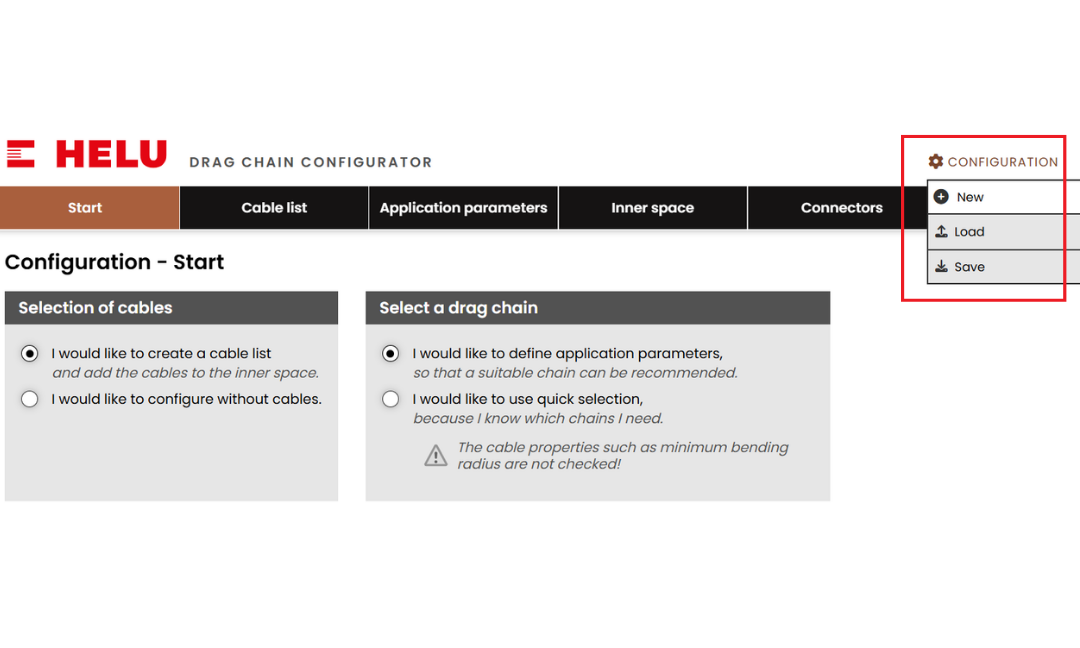
The tool runs in your browser with no installation or login, in English or German. The steps are shown as tabs across the top; move between them with the Forward / Back buttons at the bottom of the page or by clicking a tab.
Depending on your choice in the Start step, there are two configuration flows:
| Flow | Suitable for | Steps |
| Full configurations (cable list + application parameter) | You don't yet know which chain to use and want the tool to recommend and check one against your cables | Start → Cable list → Application parameters → Inner space → Connectors → Strain relief → Result |
| Quick selection (cables optional) | You already know the chain type and size you need | Start → Quick select → Inner space → Connectors → Strain relief → Result |
Three controls sit in the top-right corner:
- Configuration: New (start a new configuration), Save (save the configuration as a file) and Load (open a saved file).
- Login: for accounts issued by HELU; regular users don't need to log in.
- Language: switch between English and Deutsch.
Your current configuration is kept in the browser, so you can pick up where you left off. To continue on another computer or share it with a colleague, use Save.
A 7-step guide to selecting drag chains using the HELUCHAIN Configurator
The 7 steps to finding the right drag chain are:
- Step 1 – Start: Choose a configuration flow
- Step 2 – Cable list: Create the cable list
- Step 3 – Application parameters: Get drag chain recommendations
- Step 4 – Inner space: Plan the inner layout
- Step 5 – Connectors: Select the end connectors
- Step 6 - Strain relief: Secure the cables
- Step 7 – Result: Review the result and request a quote
The step-by-step process will be described in detail in the following sections.
Step 1 – Start: Select a configuration flow
The first step determines how you work with the tool: let it recommend a chain based on your cables and application, or select a chain you already know.
Go to
heluchain.com and answer two questions:
- Selection of cables: I would like to create a cable list (recommended) or I would like to configure without cables (the Cable list tab is then hidden).
- Select a drag chain: define application parameters (the tool recommends a chain series for your application) or use quick selection (you choose the chain yourself).
💡 Note: with quick selection, cable properties such as the minimum bending radius or cable diameter are not checked, and the result page states that the configuration was created using quick selection.
Step 2 – Cable list: Create a cable list
The cable list is what the tool uses to calculate the inner space, bending radius and load, so this is the most important step for an accurate result.
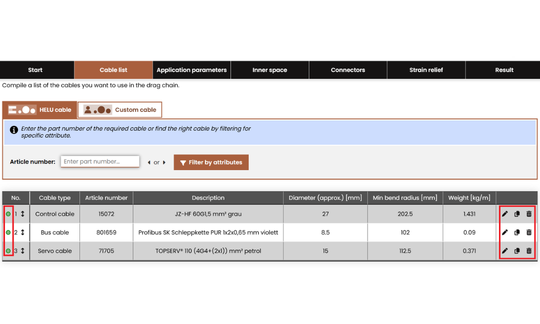
2.1 For HELU standard cables (HELU Cable tab)
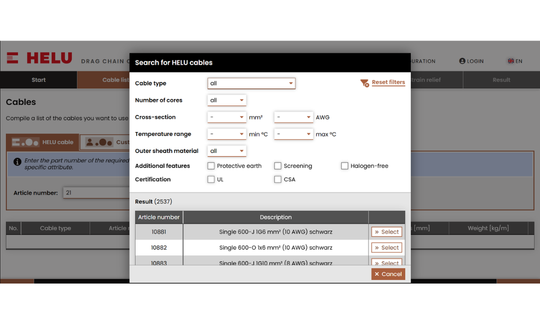
Enter an article number or click Filter by attributes to search around 2,500 HELU cables designed for drag chains by:
- Cable type: bus, data, single-core, hybrid, fiber optic, feedback/encoder, motor, servo and control cables.
- Number of cores (1 to 65) and cross-section (0.09 to 400 mm², or AWG/kcmil).
- Operating temperature range (from -40 °C to +90 °C).
- Outer sheath material: PUR, PVC or TPE.
- Features: protective earth, screening, halogen-free; UL/CSA approval.
When you select a part number, the tool displays the diameter, minimum bending radius, weight, temperature, and a link to product information. See also HELU's range of drag chain cables. !
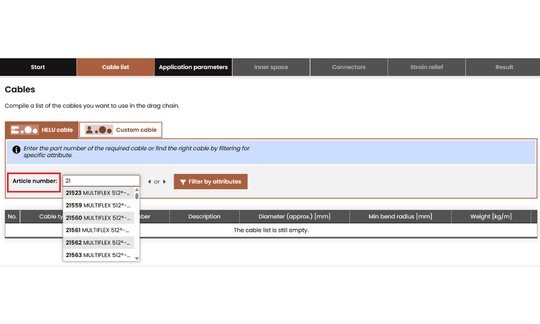
💡 Tip: you can add as many different cables as you need. Each row can be edited, duplicated or deleted, and the dot at the start of a row turns green once that cable has been placed in the inner space in Step 4.
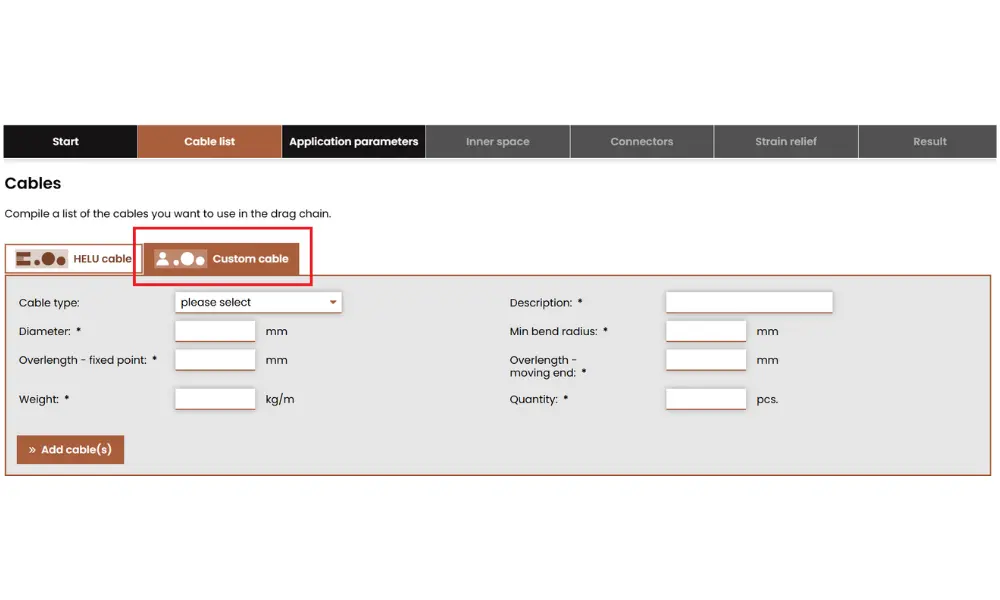
Enter the specifications for the custom cable
2.2 Custom cable (Tab Custom Cable)
If HELU's standard range doesn't cover your application, use this tab to enter the cable data yourself:
- Cable type
- Description
- Diameter: 3 to 100 mm
- Minimum bending radius: up to 10,000 mm
- Weight: up to 100 kg/m
5.3 Required values for every cable
Whether you choose a standard or custom cable, enter three required values and click Add cable(s):
- Overlength – fixed point: the length of cable extending beyond the chain at the fixed end (mm), up to 100,000 mm.
- Overlength – moving end: the length of cable extending beyond the chain at the moving end (mm), up to 100,000 mm.
- Quantity: number of cables (up to 100).
Step 3 – Application parameters: Selecting a drag chain
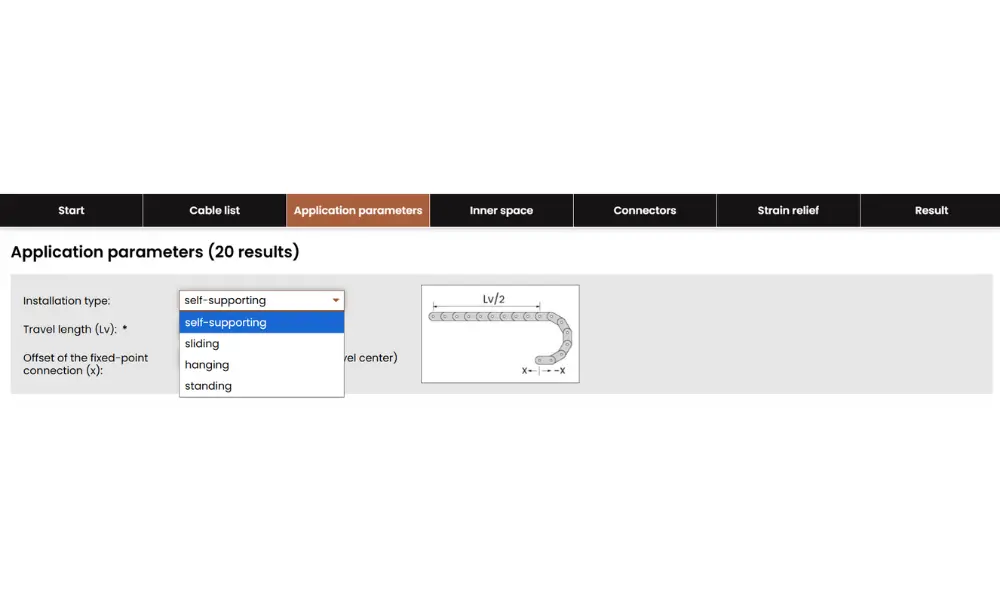
Select the installation type for plastic chains, steel chains, or hybrid chains
In this step, you describe how the chain will move on your machine so the tool can find drag chains that suit your travel length, speed and installation space.
6.1 Step 3a – Application parameters: let the tool recommend a drag chain
The top of the page has three main fields, with a sketch that changes with the installation type:
- Installation type: self-supporting, hanging or standing.
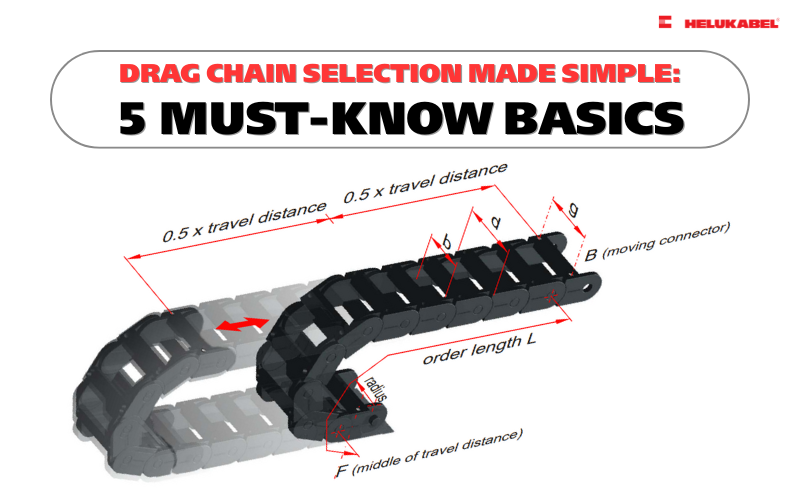
- Travel length (Lv): the travel distance in mm (required).
- Offset of the fixed-point connection (x): the distance between the fixed point and the centre of travel (mm); leave it empty if the fixed point is in the middle.
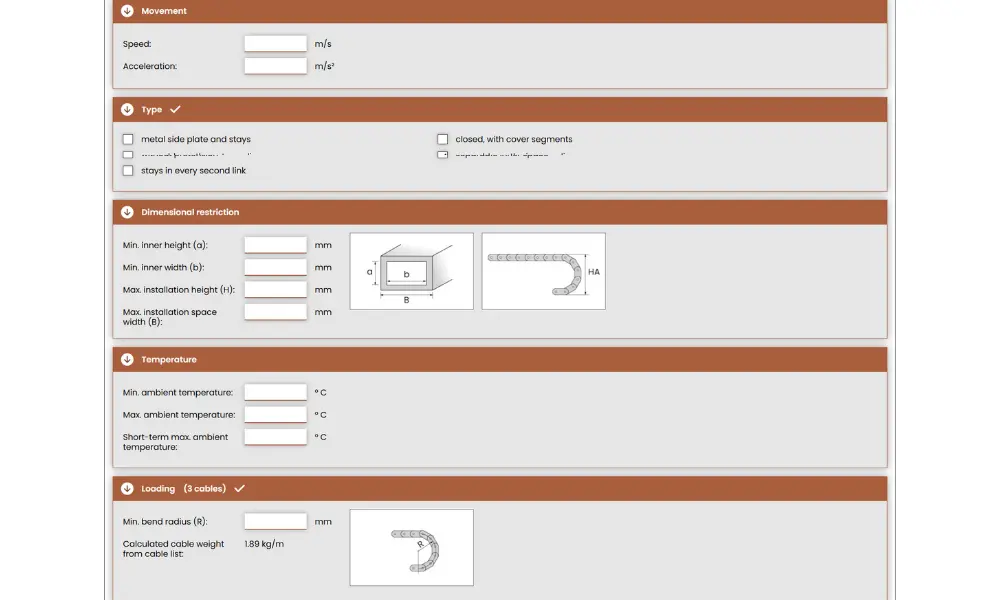
Five optional groups narrow down the drag chain results
Five optional groups narrow down the results:
- Movement: speed (m/s) and acceleration (m/s²).
- Type: metal side plates and stays, closed with cover segments, openable on the outer radius, openable on the inner radius, without pretension, separable inner space, stays in every second link.
- Dimensional restriction: minimum inner height (a) and inner width (b), maximum installation height (H) and installation space width (B).
- Temperature: minimum, maximum and short-term maximum ambient temperature.
- Loading: minimum bending radius R; the cable weight per metre is calculated automatically from your cable list.
💡 Tip: the more parameters you enter, the fewer results you get. Leave any value you are unsure of empty so the tool can show all suitable options. The longer the travel, the fewer chains will qualify.
The Selection table then lists the suitable chains by size, material, type, opening type, inner height and width, and bending radius. Click the ? icon in a column header for an illustrated explanation, and use Sort by to sort by price index or inner height.
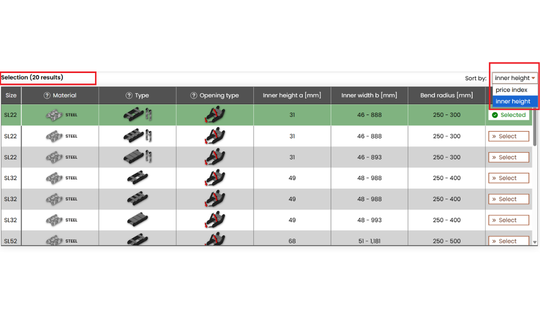
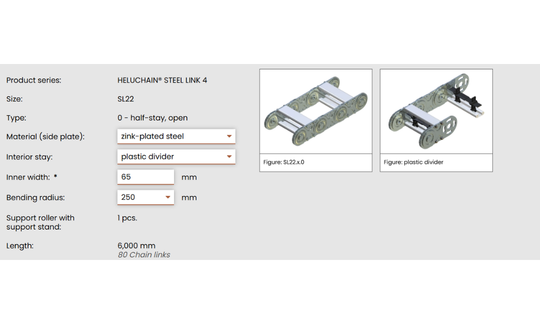
Click Select to choose a chain. The detail panel below shows the series, size, type, an image and the calculated chain length, and lets you choose the bending radius. For steel chains, you can also choose the side-plate material (zinc-plated or stainless steel), the interior stay (plastic divider or tube stay) and the inner width.
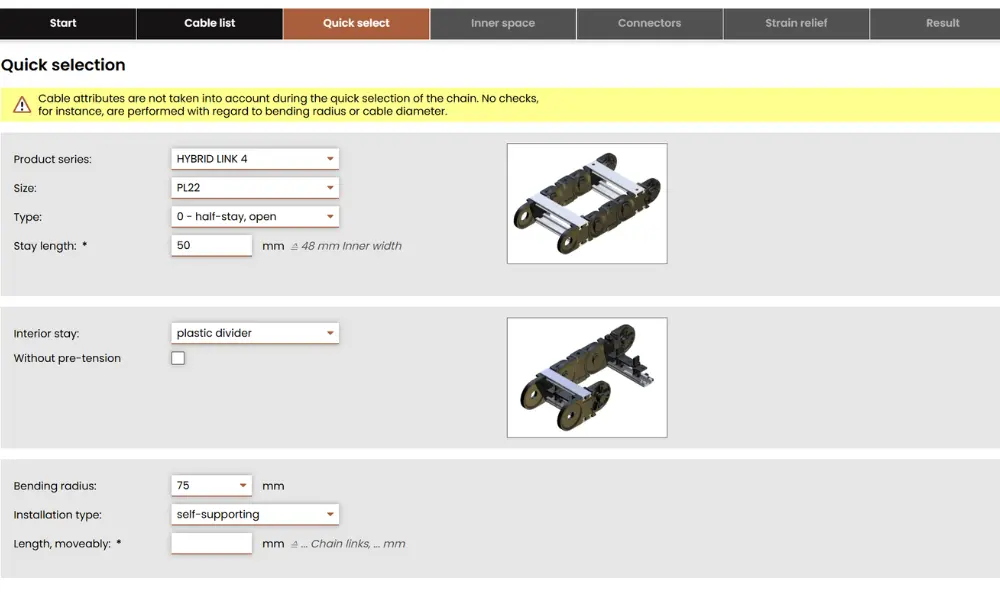
If you already know which chain type and size you need, Quick Select lets you skip the calculations and choose the chain part number directly.
3.2 Step 3b – Quick Select: Choose the chain yourself
If you already know which series and size you need, Quick select lets you skip the calculation and pick the chain directly.
- Choose the Product series (plastic, hybrid or steel drag chain) → Size → Type → width or series-specific options.
- Tick Without pre-tension if you need a chain without pretension.
- Choose the Bending radius and Installation type (self-supporting or standing).
- Enter the chain length in Length, moveably. The tool rounds it to whole links – for example, 1,500 mm on a KL30 becomes 43 links = 1,505 mm.
- For STEEL LINK 4, choose the number of support rollers (0–2).
💡 Note: quick selection does not take cable properties into account. For example, the chain is not checked against the minimum bending radius of your cables, so compatibility is not guaranteed.
Step 4 – Inner space
This step defines how cables and dividers are arranged inside the chain, so the cables don't rub against or twist around each other in operation.
4.1 Inner space options
Choose one of three delivery options:
| Option | Best when | Advantages | Note |
| Configuration with graphic editor (assembled): Lay out the cross-section in the editor; the chain is delivered assembled to the drawing | You have a cable list; cables and hoses vary in diameter; power and signal cables must be separated | Every cable has its own position, with a dimensioned drawing; the chain arrives pre-assembled, ready for cables | Takes longer to set up (use Fill automatically, then adjust) |
| Only dividers are evenly spaced (mounted): Enter the number of dividers; the tool spaces and mounts them evenly | No cable list yet; cables are of similar size | Fastest, no drawing needed; the chain still arrives pre-assembled | Individual divider positions cannot be set |
| Selection of inner-space items (supplied loose): Choose the items for one link; the tool multiplies them by the chain length; supplied loose | You assemble in-house; spare or replacement chains; the cable layout may still change | Flexible; the chain can be delivered open (Delivery of the drag chain in an open state) for easier cable laying | You fit the dividers yourself; no layout drawing |
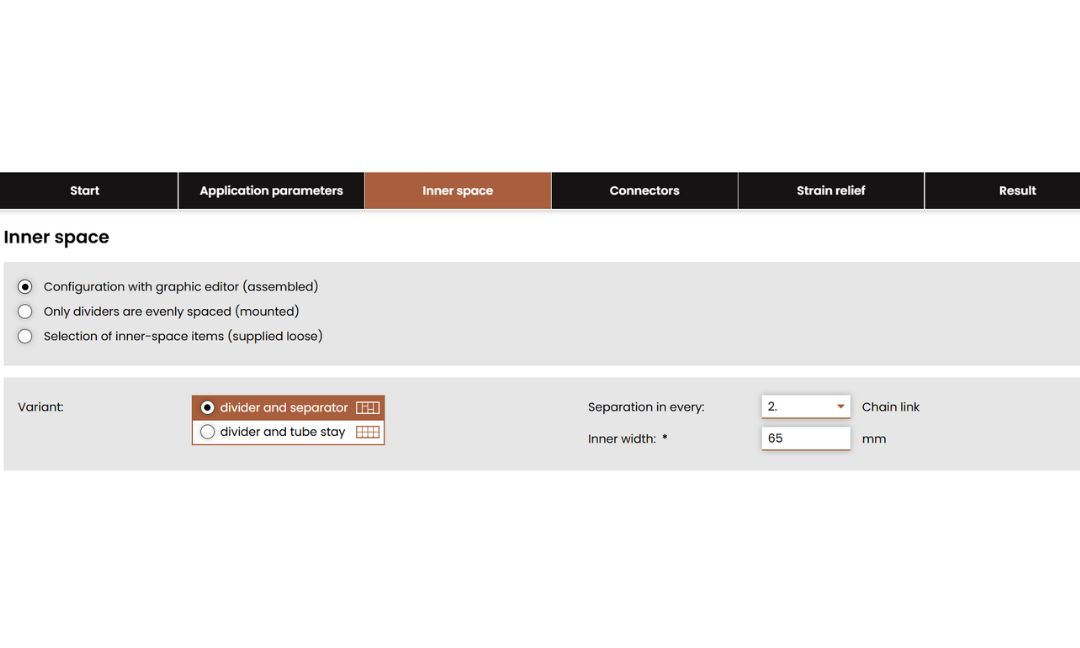
💡 Note: Only dividers are evenly spaced is shown only while the cable list is empty, because once cables are added, the dividers must be placed around each cable. The Fill automatically button is only available if you chose to create a cable list in Step 1.
General settings: Variant (e.g. only divider – vertical dividers only, or divider and separator – dividers plus horizontal shelves, depending on the series), Separation in every (dividers in every 1st to 5th link) and Inner width.
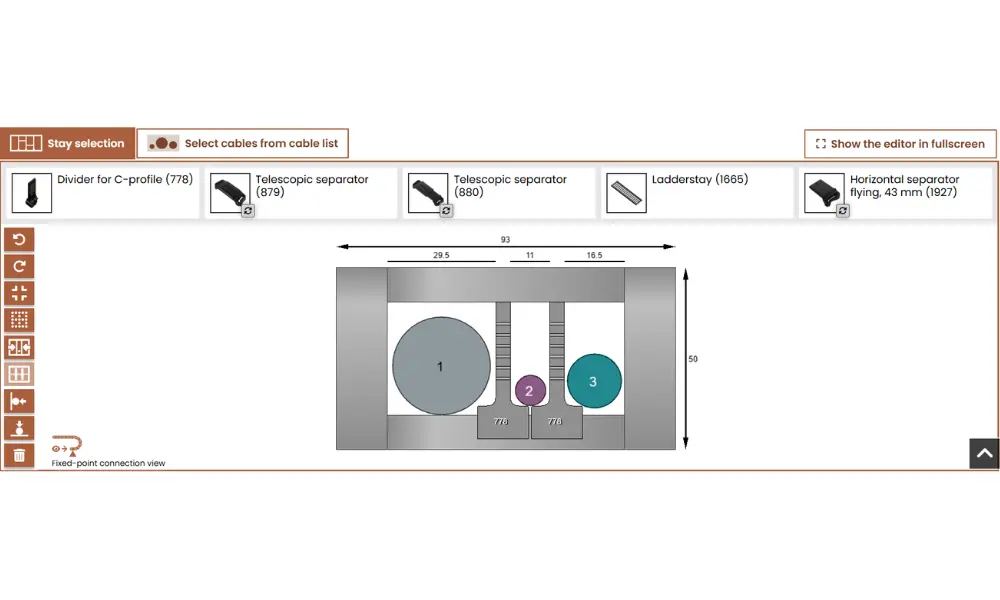
Graphical editor interface for inner space layout
4.2 Using the graphic editor
In the graphics editor:
- The Stay selection tab holds the inner-space items (dividers...); the Select cables from cable list tab holds your cables. Drag them onto the chain cross-section to position them.
- Fill automatically: the tool arranges the cables and dividers for you and shows a preview to Confirm or Cancel.
- Toolbar on the left: Undo, Restore (redo), Reset view, snapping on/off, Arrange evenly, Move cables left / Move cables down, and Delete.
- Fixed-point connection view shows the cross-section from the fixed end; Show the editor in fullscreen gives you more room to work.
Step 5 – Connectors
The connectors determine how the chain is attached to the machine. The right choice makes installation quick and secure.
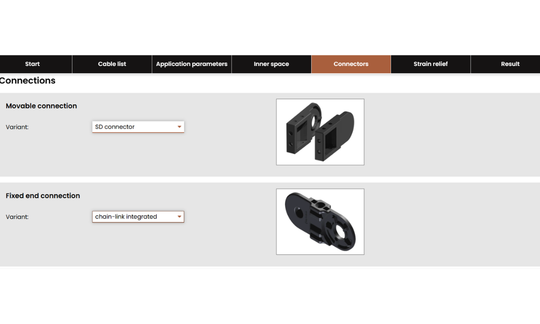
You choose separately for the moving end (Movable connection, attached to the moving machine part) and the fixed end (Fixed end connection, attached to the machine frame). Each option is shown with a 3D image. The options depend on the chain series and size and fall into four groups:
- Chain-link integrated connectors
- Flange connectors / SD connectors (some with a C-profile for mounting strain relief)
- Scoop mounts or separate connection parts for small plastic chains
- Connection brackets for hybrid and steel chains
💡 Note: choose without if you don't need HELU to supply the connectors.
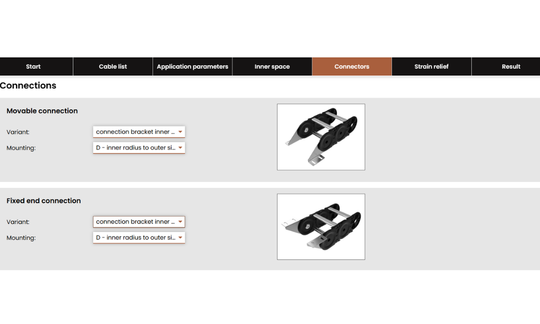
For connection brackets and scoop mounts, the tool also asks for the Mounting type:
| Code | Bracket position | Bolting face points |
| N / C | Outer radius | Inward / outward |
| E / D | Inner radius | Inward / outward |
| A / B | End flange | Inward / outward |
Check where the mounting surface on your machine sits relative to the chain (above, below or at the end), choose the code with the matching bracket position and bolting direction, and compare it with the 3D image on the right. The moving and fixed ends can use different codes.
Step 6 – Strain relief
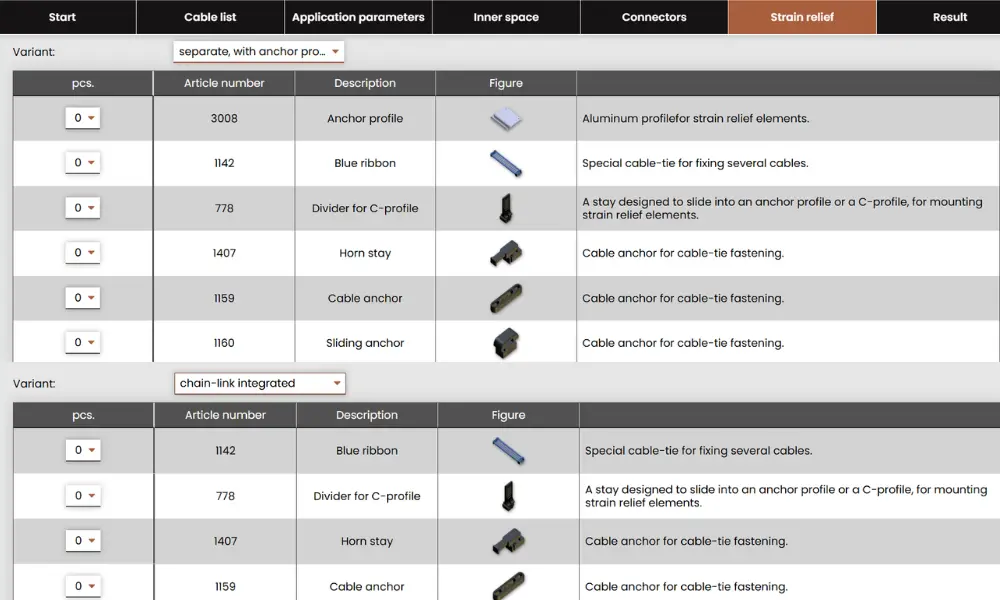
Option to reduce cable load at both ends
Strain relief clamps the cables at both ends of the chain, protecting the electrical connections from pulling forces and stopping the cables from sliding inside the chain throughout its service life.
For each end, choose one of two types and enter the quantity (0 to 10) of each item:
- Separate, with anchor profile: an aluminium anchor profile is fitted at the chain end, with clamping parts such as cable anchors, sliding anchors, horn stays and blue ribbon cable ties. Ideal for many cables or cables of different diameters.
- Chain-link integrated: the clamping parts (usually horn stays) attach directly to the end link, with no anchor profile – a more compact solution.
💡 Note: the available items and part numbers depend on the chain series and size; some small plastic chains (PLASTIC LINK 1) have no strain relief items. If you're unsure of the quantities, leave them at 0 and add a remark to your quotation request so HELU can advise you.
Step 7 – Result, Reports, and Request for a Quote
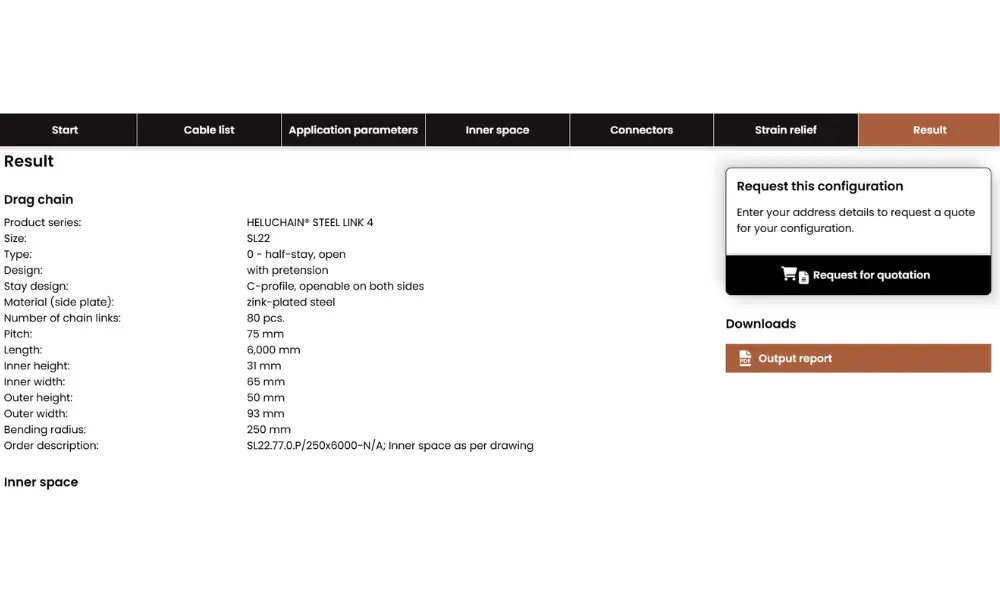
Cable chain configuration results, detailed reports, and requests for quotes
The final step turns your complete configuration into an order code and a report, ready to save or send with a quotation request.
7.1 Summary of results
The result page summarises everything you configured:
- Drag chain: series, size, type, design (with or without pretension), stay design, number of links, pitch, length, inner and outer dimensions, bending radius and order code (e.g. KL30.050.0/40x1505).
- Inner space, Connector, Strain relief: the selected options and accessories, with part numbers and quantities.
- Cables: the cut length of each cable (chain length plus both overlengths) and the cable weight per metre.
- Application parameters and the inner-space drawing viewed from the fixed end.
7.2 Request for a quote
- Output report: download the "Chain configuration" PDF to share the configuration with colleagues and other departments.
- Request for quotation: fill in the form and click Send; your configuration is sent to HELU and our team will get back to you as soon as possible.
Drag chain series in the configurator
The tool currently covers five HELUCHAIN series, from small plastic drag chains to steel chains for heavy loads:
| Product Line | Type | Size | Type |
| PLASTIC LINK 1 | Plastic | KL10, KL13, KL15, KL22, KL30 | Single-piece links with film hinge or spring bar |
| PLASTIC LINK 2 | Plastic | KL15 to KL65 | Standard / reinforced / covered, openable on the inner or outer radius |
| PLASTIC LINK 4 | Plastic | PK11 to PK52, PK45 | Half-stay / full-stay, open or covered, with or without sliders; multi-band chains available |
| HYBRID LINK 4 | Plastic side plates, aluminium stays | PL22 to PL63 | Half-stay / full-stay, open or covered, with or without sliders |
| STEEL LINK 4 | Steel or stainless-steel side plates, aluminium stays | SL12 to SL62 | Half-stay / full-stay, open or covered; optional support rollers |
The order code follows the format Size.Outer width.Type/Bending radius x Length. For example, KL30.050.0/40x1505 means:
- Chain size KL30
- Outer width 50 mm
- Type 0
- Bending radius 40 mm
- Length 1,505 mm
Tips for using the drag chain configurator effectively
To get the most out of HELU's drag chain configurator, keep these tips in mind:
- Start with your cable list if you're not sure which chain to use - the tool filters by the bending radius, weight and space your cables need.
- Add third-party cables and hoses as custom cables so the inner space is calculated correctly.
- Choose a chain bending radius at least equal to the minimum bending radius of your largest cable to extend cable service life.
- For dusty environments, chips or outdoor use, choose a covered plastic or hybrid drag chain.
- Use Sort by → price index to show the most economical options first.
- Save your configuration before trying alternatives, so you can compare them or share them with colleagues or HELU's technical team for advice.
Frequently Asked Questions
Yes. The tool is free and runs directly in your browser at heluchain.com, with nothing to install.
No. You can configure a drag chain, download the report and request a quote without logging in.
Yes. Use the Custom cable tab to enter the diameter, bending radius and weight of any cable or hose.
Not necessary. Select "Quick Selection" in the "Start" step to directly choose the chain type, size, and length. Note that this method does not check for cable compatibility.
The results are based on HELU's current product data and are for guidance only. For special applications, send us your output report or a quotation request so HELU's engineers can review it.
Conclusion
The HELUCHAIN Configurator lets design engineers and buyers specify the complete drag chain, cables and accessories in a single flow, with an order code, cable cut lengths and a PDF report as soon as they finish. Whether you need a cable chain for a new machine or a replacement for an existing one, the tool significantly shortens the selection process.